
This product has been upgraded
Click on the image above or here to see its replacement.
To understand how we arrived at the tarp + bivvy bag setup for long duration treks in warmer conditions, please read our companion post "Reasons To Go Modular".
As always, we're looking at the Scramble G-Mod 55 from the point of view of long distance trekking over tough terrain.
Test subject: Height: 5ft 8"
Test item: G-Mod 55 (Beta - Development Version)
Kit Tests: Summer (multiple)
Disclaimer: The G-Mod tarp series are partly manufactured by Scramble. We made them because we weren't happy with existing offerings (as outlined below). So this is less of a review and more an outline of a product. Clearly we think they're the best, otherwise we wouldn't have gone to the trouble of developing them.
Datasheet
| G-MOD 55 TARP | |
| Main Fabric: 20D Silicone Coated 360T Ripstop Nylon | - |
| Attachment Points: 420D PU Coated Ripstop Cordura (Number = ) | 12 |
| Attachment Loops: Dyneema/Polyester Cord + High Retraction Elasticated Cord | 12 x 1.5mm / 6 x 3mm |
| Hydrostatic Head: | 8,000mm |
| Dimensions: Length x Width (Coverage) | 260 x 210 cm (5.46 sqm) |
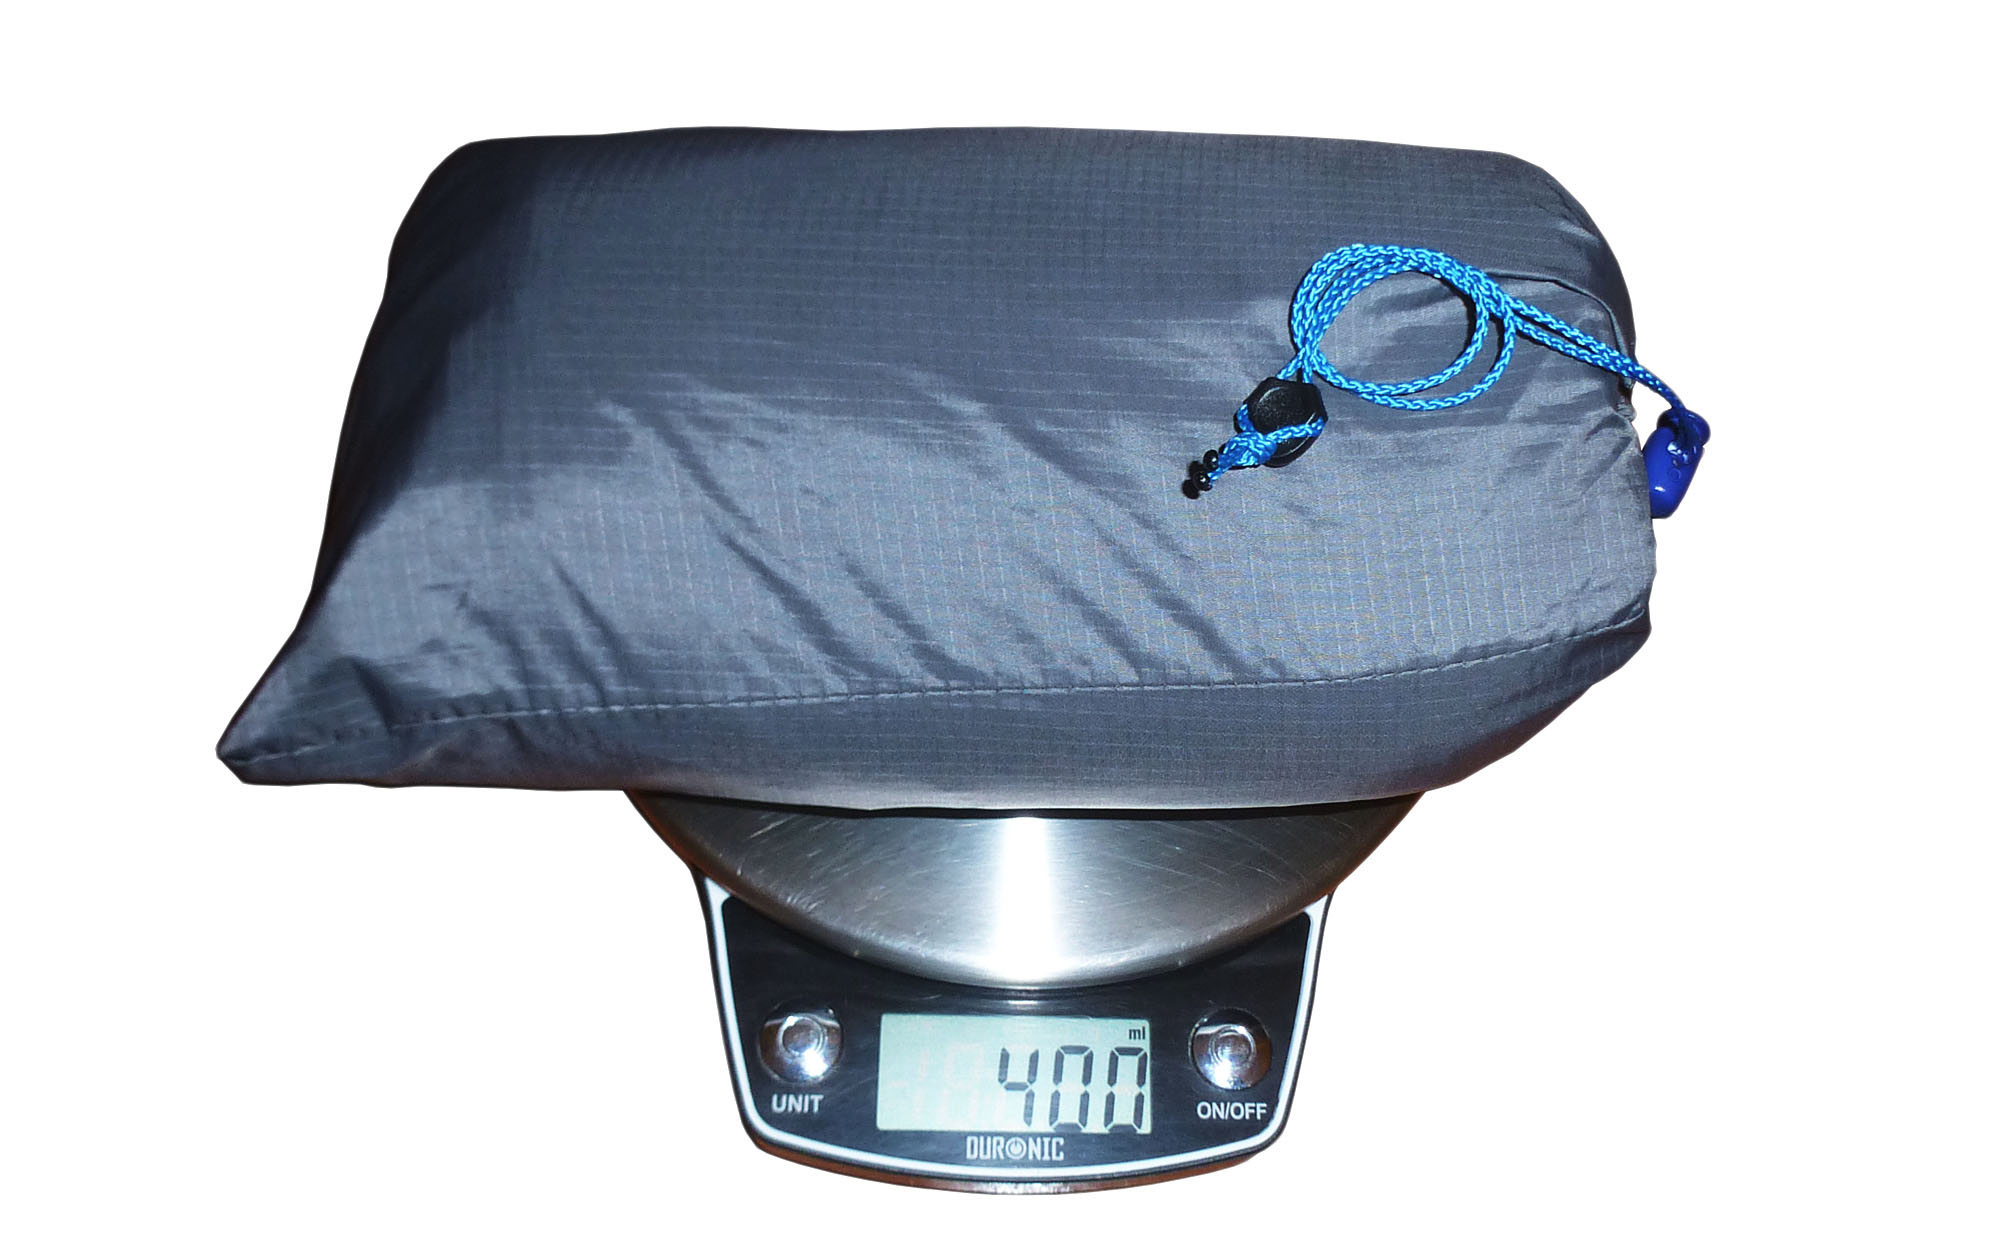
| Tarp Weight (measured): Tarp + Tarp Bag | 392g + 8g = 400g |
| ACCESSORIES | |
| DAC NSL Pole Dimensions (3 sections, Total Height x Width): | 123cm x 10.5mm |
| DAC NSL Pole Total Weight (measured, 3 sections + ends + Scramble connector): | 97g |
| Fixings: Cordage, Clips, Line-Loks (Total Weight = ) | 28g |
| PRICES | |
| Scramble's G-Mod 55 (Development) Bargain 30% off on SYSTEM | £47.60 |
| Scramble's G-Mod 55 (Final) - Introductory Price on SYSTEM | £68.00 |
| DAC NSL Pole (3 Sections, 10.5mm) - Scramble's Price on SYSTEM | £22.95 |
Scramble Review
Contents
- Introduction
- Design: 1) Protection
- Design: 2) Headroom
- Design: 3) Pest Control
- Design: 4) Quick Shelter (Ease of Use)
- Materials
- Poles & Connectors
- Packed Up
- Conclusion, Rating & Product Images
- Postscript: Relevant carry-over info from G-Mod 38 outline
Introduction
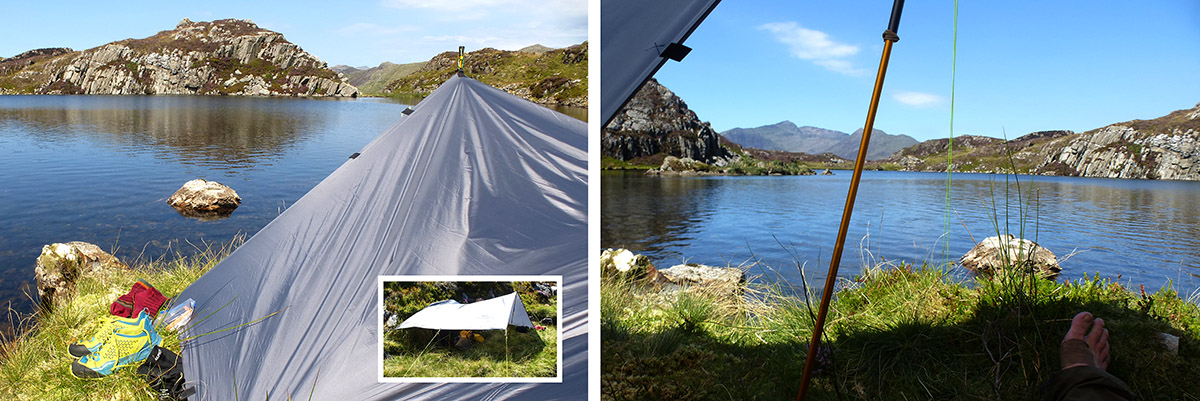
We created the G-Mod 55 specifically for use with a bivvy bag (rather than a hooped bivvy) for those of us who sleep on the ground (not in hammocks) and who want something that provides plenty of overhead coverage (enough for two), that packs down small and is both light and yet tough enough to deal with the worst mother nature likes to hurl at us.
 Scramble's G-Mod 55 with one side pegged to the ground
In simple terms the G-Mod 55 is just a larger version of its smaller siblings the G-Mod 35 and 38; we wanted to maintain the same minimalist principles behind these smaller tarps, but due to some important prerequisite demands we had for the G-Mod 55, there's a little more to it than the stark simplicity of Scramble's G-Mod 35 and 38 tarps.
We needed the G-Mod 55 to:
- [ Protection ] Be able to have two adjacent sides sealed to the ground whilst not sacrificing over-head cover. This would ensure that in bad conditions the user could be completely sheltered from lateral precipitation.
- [ Headroom ] Work with two DAC Featherlite NSL poles. A "front" 3-section 10.5mm pole that stands 123cm tall and a back 2-section 9mm pole that stands 80cm tall. This combination provides excellent headroom, allowing the user to sit upright with plenty of overhead cover.
- [ Pest Control ] Work well in conjunction with ultralight bug / mosquito nets. The major weakness of the tarp + bivvy bag setup is the lack of any meaningful barrier between the user and biting insects. We tested the G-Mod 55 with the excellent Sea To Summit Nano Solo Net.
- [ Simplicity, Ease of Use ] Be so quick and easy to setup that it would also function as a quick shelter for short breaks on long treks, whether to shelter from incessant rain or baking sun.
Here's an early schematic:
 Scramble's G-Mod 55 - an early schematic
Okay, so let's see what the G-Mod 55 has to offer.
1. Protection
The G-Mod 55 provides 5.46 sqm of coverage. It works best with at least one side sealed to the ground in a kind of A-Frame / Lean-To hybrid setup, with 3 guylines (one for each pole and one for the raised corner). To accommodate this setup meant the tarp required an asymmetric system of attachment points.
The G-Mod 55's dimensions are 210cm x 260cm, if you take the shorter side as your front end and rely only on a middle attachment point, you have two sides of 105cm. If you want to accommodate a 123cm pole (even if not perfectly vertical) then neither of these corners can be pegged to the ground. Even if you take the long side, it doesn't take Pythagoras (or perhaps it does) to figure out that the angle is going to be impractically steep and unstable in high winds.
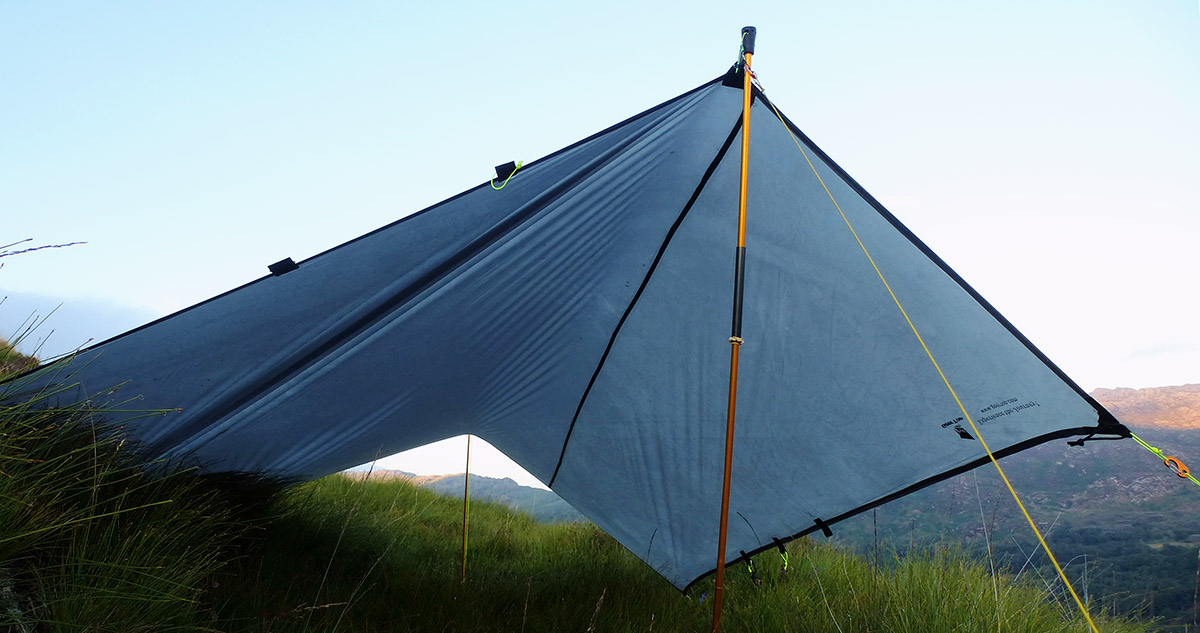
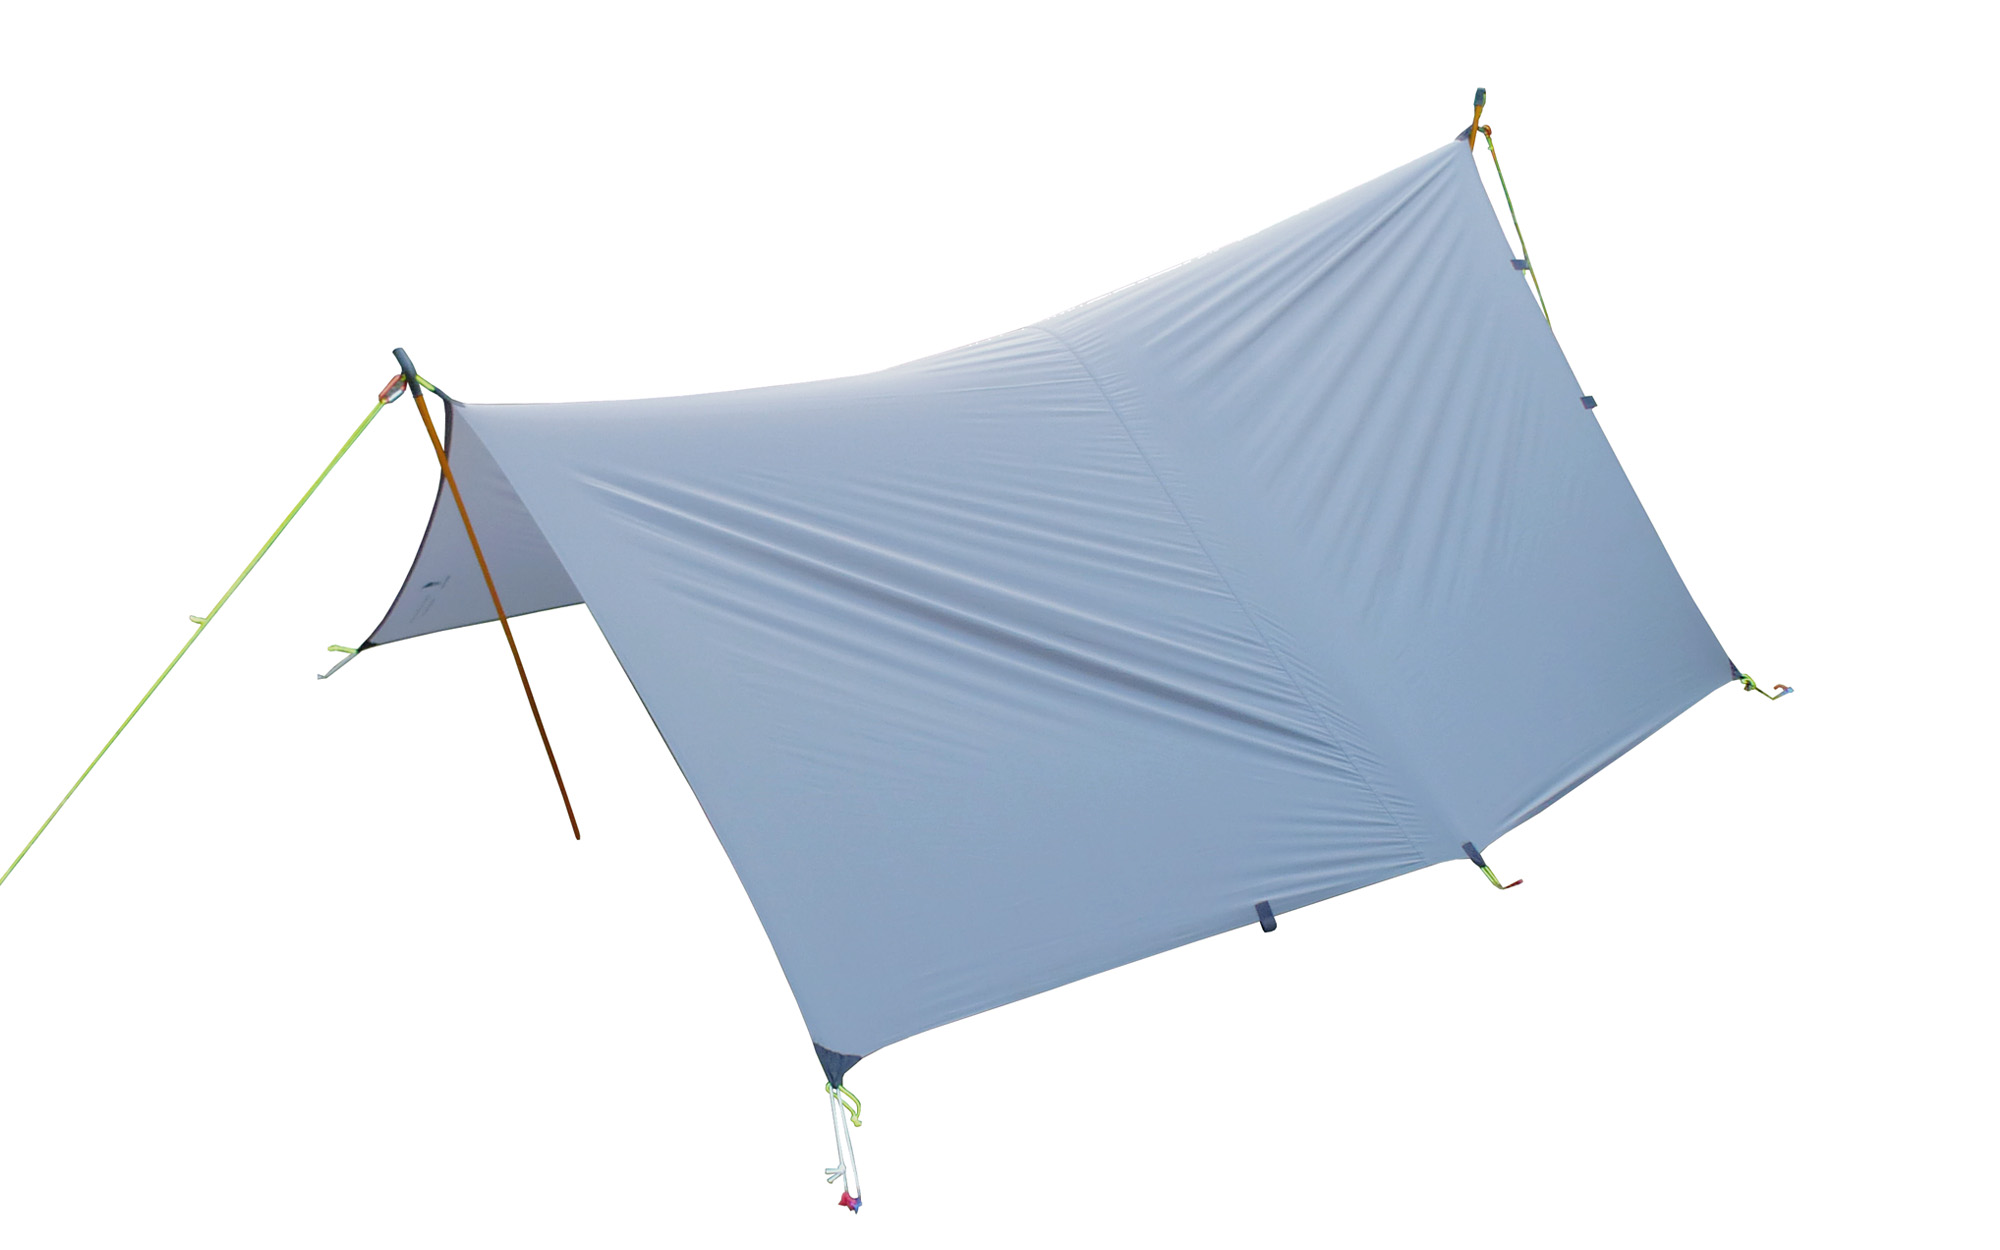
This problem has been solved by having 3 "central" attachment points at the front end and an additional off-centre attachment option on each of the long sides. The image below shows the effect this creates - a native "A-Frame / Lean-To" hybrid - which looks, to this shady mind, like a dog relieving itself:
 Scramble's G-Mod 55 in its default setup, with the tall pole on the "front" side
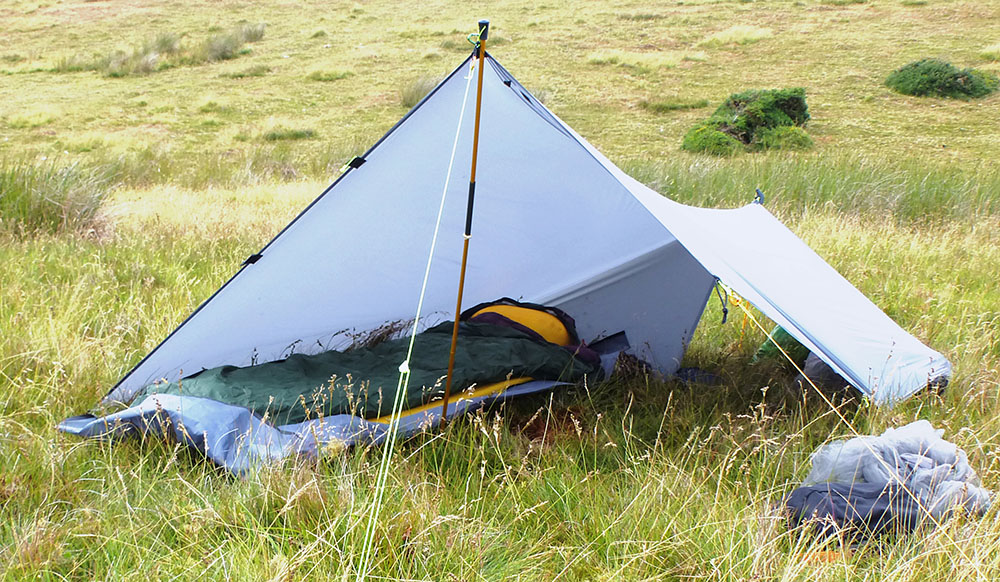
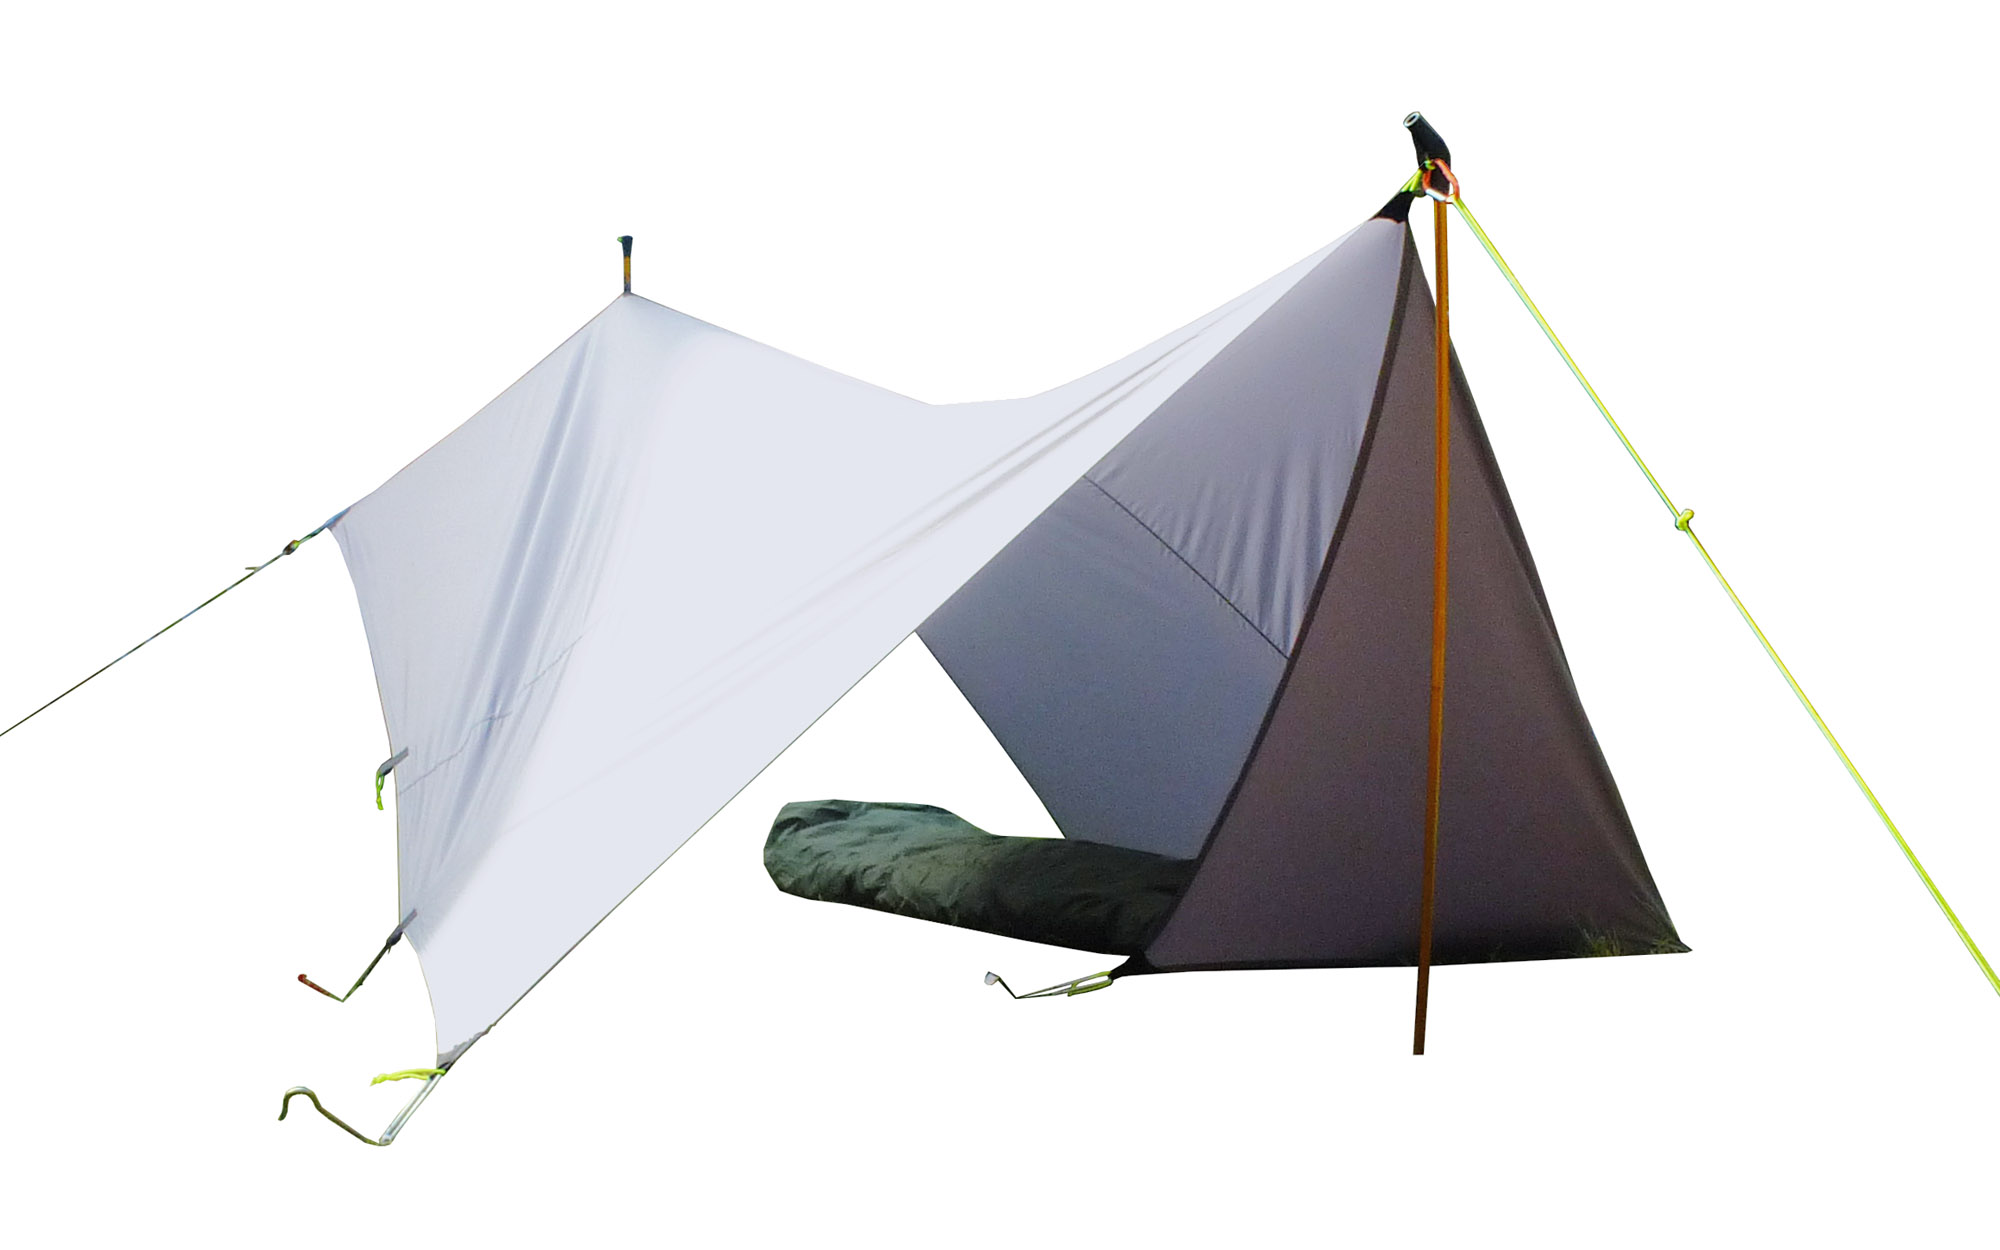
From the back, the same setup looks quite normal. As, regardless of the attachment point selected at the front end, all roads (ridges) lead to a central attachment point at the back. Here you can see that there's a ton of room, easily enough for two bivvy bag users and all their kit, whether sleeping end to end or side to side.
 Back view of the G-Mod 55
The other asymmetry occurs on the long sides, where we wanted to be able to seal off the back end and create a fully shielded corner section.
 The G-Mod 55 with two adjacent sides providing a sealed off corner.
As with the smaller G-Mod tarps, the G-Mod 55, in addition to the standard Dyneema attachment loops, features high retraction elasticated cord loops at each corner to reduce strain on lightweight poles in high winds. However, the G-Mod 55 also has an extra set 80cm before the end corner. Allowing an 80cm "back-cover" (pictured above).
In the image below, you can see that we initially considered having a more symmetrical design but it was decided this was unnecessary and in testing didn't bother to add loops to the attachment point (and didn't miss their exclusion either).
 Here you can see the use of the additional guyline pegging out the raised corner.
Apart from the removal of this redundant attachment point, one minor modification has been made to the final release models.

We've shifted the off-centre attachment point back 10cm. So rather than at 90cm, as pictured above, it's now 80cm from the back. This still maintains enough cover for the tucked in "back shield", but also makes for a better option when the tarp is setup in "wide" mode (i.e. when the front pole is used at the long 260cm side). This allows one side of 180cm pegged at the corner, while a shorter 80cm "roof" section is guyed out.
Obviously the wide approach also works well for a classic A-Frame, but we've been impressed by the hybrid setup and that became the default setup on the latest kit test (Summer 2018).
Below is the complete schematic for all the attachment points and their accompanying attachment loops.

We've colour coded the attachment loops to make setup (especially in poor light) as easy as possible. For example, grab the two corners with the white elasticated loops and you know you're holding the back end.
The symmetrical Dyneema attachment loops (at the corners and at the mid points of each side) are all high viz yellow, whereas the asymmetical attachment loops are coloured black. This makes it really easy to navigate which loop to attach to which pole or peg.
This may sound trivial but when you're in a hurry in really torrid conditions, navigating your way around an unpegged 5.5 square meters of flapping fabric is useful.
2. Headroom
All G-Mod tarps ensure the user is able to sit upright under them without sacrificing protection from the elements. This is why we design them for, and test them with, the 123cm 3-section DAC pole.
Here's how the G-Mod 55 stacks up using 2 traditional tarp setups:
A-Frame

Lean-To

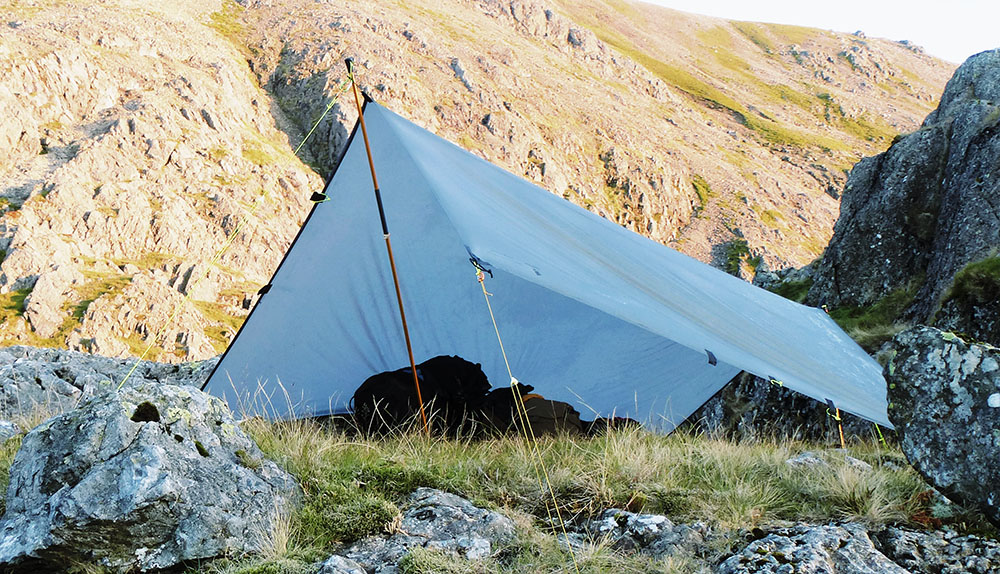
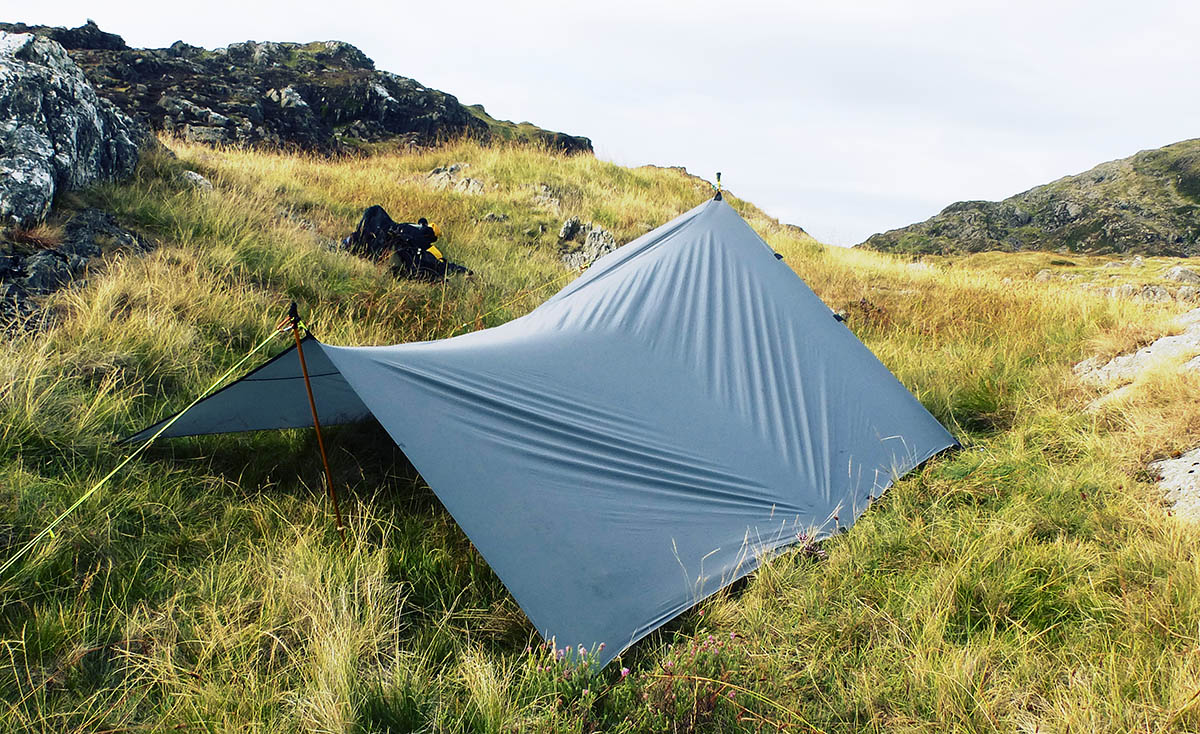
One of the great features of tarps is their flexibility. In the image below, this slope is actually much steeper than it looks. I'd found a narrow strip running left to right and slept well on that, but the tarp is on a roughly 30 degree slope.
There's so much space under the G-Mod 55, that for long solo treks, not feeling cramped makes for quite a luxurious experience. I even felt like I was kicking back and relaxing! Scramble kit tests don't often feel like that.
 Scramble's G-Mod 55 keeping a low profile: A wide A-Frame on a steep slope
3. Pest Control
In the latest 12 day 2018 Summer Kit Test, 3 out of 11 nights required the mosquito net to avoid mosquitos, horseflies and other biting nasties. The rest of the nights were in sufficiently exposed areas (where mosquitos and midges don't do so well). At 85g the Sea To Summit Nano Pyramid Solo Net is hardly a burden and weighs less than many anti-mosquito roll-ons and sprays which don't work.
I made a simple adjustable cord from a loop of 2mm bungee and some 1.5mm Dyneema / PES cord with a Line-Lok mini, this allowed me to run the cord on the underside of the tarp from pole to pole and adjust it if the tarp was setup with the front pole on the long side or the short side. The bungee just allows some give so the two poles aren't pulled together in strong winds. The head of the mosquito net just clips on to and hangs down from the cord.
 The G-Mod 55 worked well with Sea To Summit's mosquito net
What you end up with then is something approaching a tent. You get the benefits of a tarp - spaciousness, great views, a feeling of being outdoors, but with the kind of wind, rain and insect protection that one expects from a tent. I slept extremely well every night and for long distance treks from late spring to early autumn use the G-Mod 55 + bivvy bag as my default setup.
4. Quick Shelter
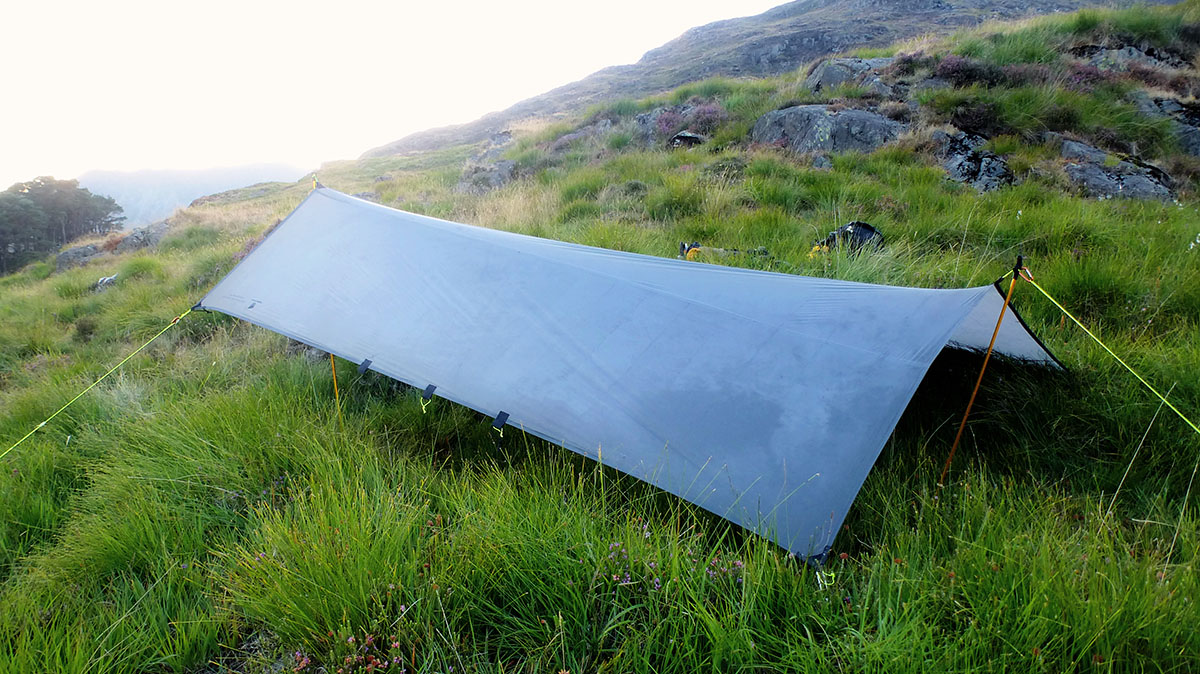
As we outlined in Reasons To Go Modular, one of the benefits of carrying a tarp is that you can setup almost anywhere and, when well practiced, in very quick time. One example is this rather idyllic setting. The temperature was 35°C and I just wanted to rest up, have some lunch and cool down. No natural shade - not a problem. 5 minutes later I was able to relax and enjoy the setting, refuel and rehydrate.
 Scramble's G-Mod 55 in Quick Shelter mode
Materials
Made in the UK (Kind of)
The main tarp material is imported prefabricated (silicone coated, edged and seam-sealed) from Geertop in Hong Kong (thus the "G" in G-Mod) along with stuff sacks. Lightweight stuff sack cord, tarp attachment material and attachment loop cord is all imported from Germany. These are then stitched by a small textile company in the UK and we finish them off at Scramble by waterproofing the attachment point stitching using a combination of silicone based sealants, then we add the attachment loops

Fortunately, the image below is not of condensation. This is instead the gratifying view of someone nice and dry during an early morning downpour. As we're using the same material as the G-Mod 38 the G-Mod 55's waterproof credentials were already well established.
 Scramble's G-Mod 55 shrugging off an early morning downpour.
Packing Advice
As we've noted before the Geertop material we've used has a higher hydrostatic head (is more waterproof) than many tarps on the market. It's also incredibly air-tight and thus wind resistant. If it was a tent this would be a real condensation issue, but tarps don't have a problem "breathing". However, this air-tightness means you can't just thoughtlessly stuff it back in its stuff sack - air-pockets will form and it'll be a hassle to pack.
A simple packing method will ensure it packs away nice and small.
 Packing the G-Mod 55 to avoid air-pockets
Poles & Connectors
For the G-Mod 35 and 38 tarps we recommend 9mm diameter poles. But for the G-Mod 55, being substantially larger and that much heavier, we recommend beefing up just the front pole. The one pictured below is a 10.5mm DAC Featherlite NSL 3-section pole, standing 123cm tall. It works superbly and weighs just 86g all in. We also carry DAC's 13.2mm 11g repair sleeve just in case, and use it to provide additional support (which, in high winds, helps prevent unlikely breaks from happening in the first place).
 Scramble recommend the DAC Featherlite NSL's poles for anyone not using trekking poles.
At the back end we used a 9mm DAC 2-section pole which is 80cm tall. There's no native connector for the 10.5mm poles so we created one and these fit the 10.5mm perfectly. Anyone can make these, all you need is a trekking pole tip (ferrule), a drill and some strong cord. The 9mm poles work with DAC's own Arch Connector (pictured right). Both attachment methods made attaching the DAC poles to the G-Mod 55 quick and easy.
 Scramble's G-Mod 55 attached to 9mm and 10.5mm DAC poles
Packed Up
Below is the complete sleep and shelter kit bundle for the 2018 Summer Kit Test. Two items that impressed us were the Nordisk Zen 2.5 sleeping mat and Alpkit's Hunka Bivvy.
Though some tent users may consider the tarp + bivvy setup as roughing it, all I can say is that after covering 180 miles and ascending at least an Everest's worth of total elevation, the last kit test was one of the most enjoyable and fun I've been on and this is in no small part thanks to the shelter setup outlined here:
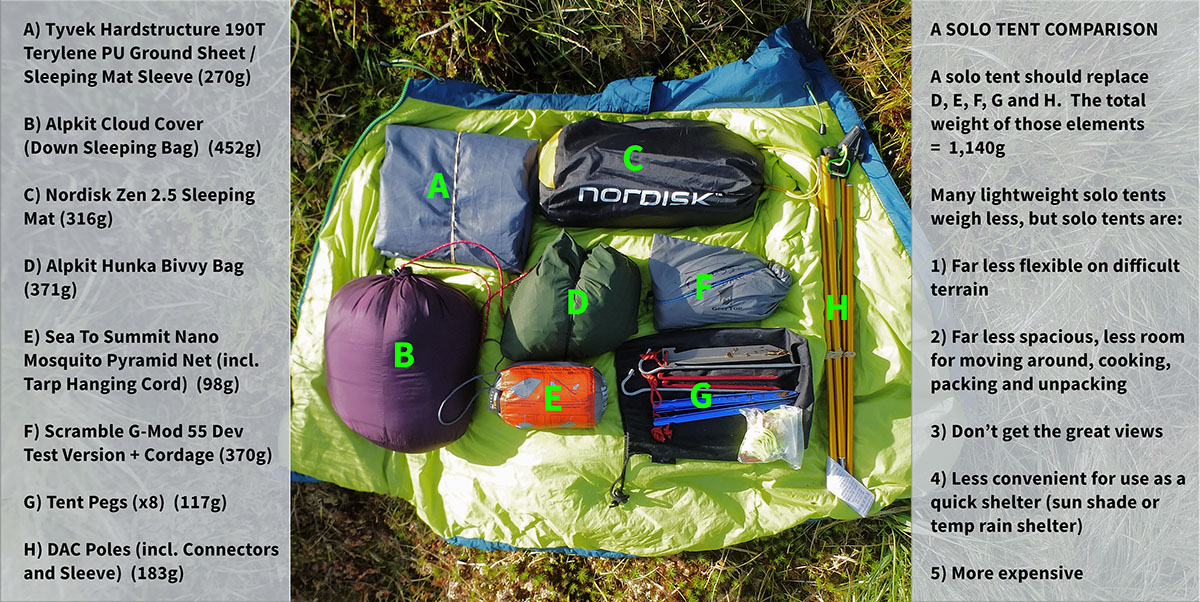 Note: stated weights include stuff sacks where applicable
The G-Mod 55 packs up comparatively small. Both it and the Sea To Summit Nano along with tent pegs and cordage all fit into a pretty tidy bundle (pictured below right).
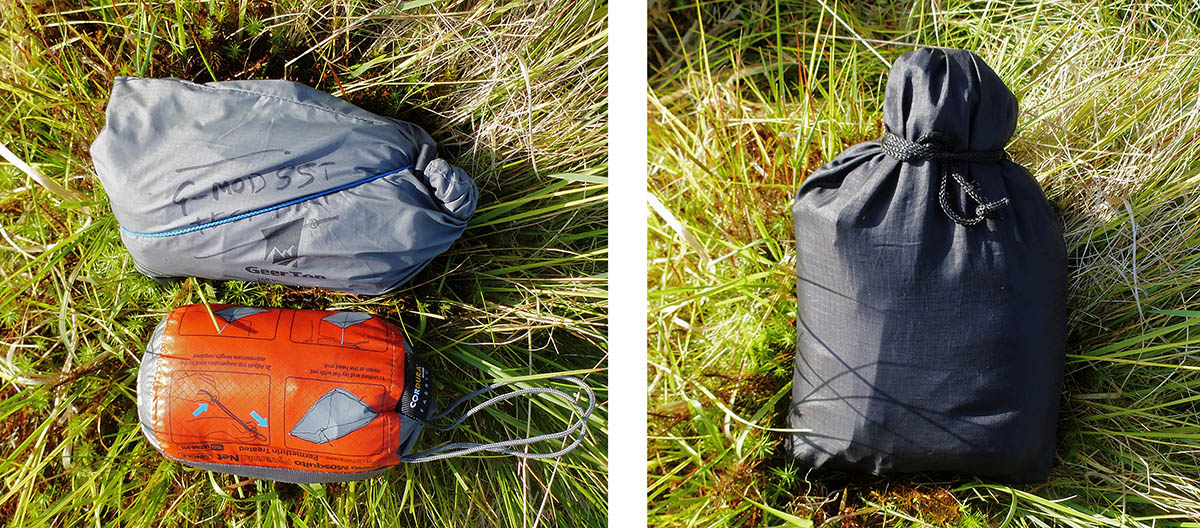 The tarp, mosquito net, pegs and cordage pack small and fit in the lid pocket of the Karrimor SF Predator 30L pack
Conclusion & Rating
The G-Mod 55 is a minimalist deluxe solo / ultralight 2 person tarp designed to be setup quickly in harsh conditions with minimal fuss. Targeted specifically at bivvy bag users, the G-Mod 55 provides 5.5 sqm of cover and is designed to have one or two sides pegged tight to the ground, creating an effective wind and rain barrier in stormy conditions.
Colour-coded, high retraction attachment loops aid setup in low light conditions and help reduce stress on ultralight tarp poles in high winds, while Cordura reinforcements and Dyneema/Polyester cord loops offer superb tear resistance and load tolerance.
With an impressively small pack size and weighing in at around 400g (including stuff sack) the G-Mod 55 makes for a highly protective and spacious shelter easily capable of accomodating two bivvy bag users. For solo long distance trekking the extra space it provides just makes everything so much easier and more enjoyable.
We made the G-Mod tarps because we weren't happy recommending UL tarps that simply didn't serve our purposes. Sometimes if you want something done properly you've got to do it yourself - we're very happy we did. The G-Mod 55 is Scramble's, unashamedly, top pick in the Tarp + Bivvy Bag category and our recommendation for anyone who has Reasons To Go Modular.
Product Images


Rating (out of 10)
Scramble make the G-Mod tarps, and while we've tried to give a rating as objectively as possible (partly based on the idea of what the competition would have to improve upon for us to throw in the towel) please take this rating with a certain amount of salt.
* The value score is derived from two factors:
1) Competitive Market Price (CMP). This represents our judgement of a competitive online price point if we were to stock the item. e.g. if we feel we would need to sell an item at 40% off (i.e. 60% of its full RRP) to be competitive, then our CMP score will be 6/10.
2) Customer Value Price (CVP). We then make an honest appraisal of the maximum price we would be willing to pay for the item (and we're mean). So if we'd pay 80% of its RRP our CVP score would be 8/10.
We then average the two scores to get our final value score, which in our example would be 7/10.
Postscript
Below is some information from the G-Mod 38 post that is relevant to the G-Mod 55:
Attachment Points
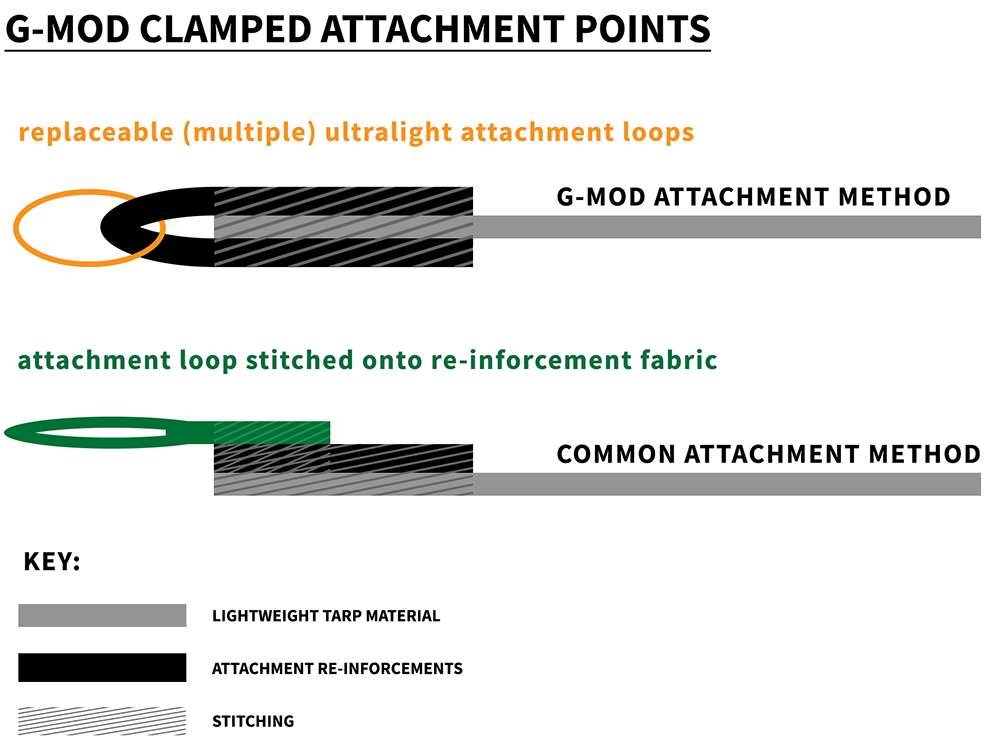
We chose 420D PU Coated Ripstop Cordura for the attachment points for its outstanding tear resistance. All attachment points feature 1.5mm Dyneema / Polyester cord loops, which have a breaking strength of 125 kilos yet each 20cm loop weighs just 0.32g. At each corner we've provided an additional attachment option: 3mm high retraction elastic cord. This is substantially stronger and has much less give than traditional shock / bungee cord, and are there when you need to reduce the strain on ultralight tarp poles in high winds. Generally, the corners lowest / pegged to the ground are best attached / pegged down via the elastic 3mm cord.
We decided on a wrap around / clamp design for the attachment points. Traditional attachment points generally have two parts: a reinforcement material onto which is stitched the attachment point. This means there are two points of failure the stitching of the reinforcement onto the tarp and the stitching of the attachment loop onto the reinforcement. The G-Mod's wrap-around design combines these two elements into one piece, reducing the failure points to one. In addition the Cordura attachment point is stitched onto itself essentially clamping the tarp. Further, this allows the user to use any number of materials for their own attachment loops (d-rings, clips, carabiners, other cord loops etc.).
The Warranty Voiding Test To Failure
Don't try this at home folks!
One of the most extreme tests we ran when testing the tarp fabric was what we call the "pole test to failure". The purpose is to stress-test the tarp material and, as importantly, to see how easy it is to make a lasting repair in the field. The test is done in exposed areas in the mountains during winter in high winds and involves marking a spot on the tarp fabric (somewhere near the mid-front), then setting up the tarp normally, but pushing the pole end into the actual fabric (rather than attaching it to an attachment loop - this is a stupid thing to do and will void the warranty). We then let the wind do its thing. This is done twice each day (once at night in porch mode and once during the day in quick shelter mode). What are we measuring?
- How long before we wake up with the pole sticking through the tarp material?
- What is the scale and nature of the rip?
- How easy is it to repair in the field?
- How long lasting is the repair?
The test was done 3 times in three very different locations. The average time it took before the fabric gave way was 4.5 days (which is excellent and a testament to the high thread count of the Geertop material). The rip was a pretty standard slit approx 12cm long - so the ripstop "quarantined" the tear. Each tear was able to be repaired with one 20cm strip of Spinnaker Repair Tape on the top side. On return this was then reinforced by coating the under side of the ripped area using Goop Marine adhesive (to waterproof the repair) and then applying another strip of Spinnaker Repair Tape to the underside (over the sealant). In all cases these test tarps are still going strong and are still completely waterproof. Below is my test G-Mod 35 (which has been through the mill) pictured in 2018; the pole stress-test had been conducted in 2016.
Last Updated: 22/09/18


